

What to do when you open your first Sonos Speaker
So you've decided to purchase a Sonos speaker. Great! Now we just need to complete the Sonos set-up.
This blog will walk you through exactly how to set up your Sonos system with the Sonos app, along with a few hints and tips along the way.
Fortunately, the Sonos system has been expertly refined over many years to make the whole process more straightforward.
Sonos speaker set-up should take you no more than 5 minutes, meaning you can set up a Sonos system around the home quickly, without hassle.
Once you've registered your Sonos account and set up that first speaker, it becomes even more straightforward to add additional speakers. You can add your whole Sonos system to the WiFi in one go or take it slow and build on it over time.
Setting up your first Sonos Speaker - Sonos One, One SL, five, Beam, Arc, Sub, Port & Amp
Step 1 - First thing's first, make sure your chosen controller, whether that's a phone or tablet, is connected to the same WiFi you intend to connect to your Sonos System too.
Step 2 - Connect your speakers to mains power and you should see the Sonos flashing green light appear on top, meaning it's ready to add to your system.
Step 3 - Next, download the Sonos App from the App store on your chosen device and open it.
Step 4 - You'll be asked whether you're setting up a new Sonos system or if you want to connect to an existing one. If you've not had any Sonos products before, select Set up a new system.
Step 5 - You will then be guided through the steps, including setting up your Sonos account. Note: You will need to be able to access your email and verify your account email from Sonos before you can continue.
Once your Sonos account is registered, you will be prompted to input your WiFi password.
Step 6 - Once connected to the WiFi, this will allow you to control your Sonos speakers within your home's WiFi network using your phone, tablet or mac /PC controller, without needing to connect anything with cables.
Step 7 - Once you are connected to your home WiFi, you will be asked to give your speaker a name. This is usually the room your speaker is located in.
Step 8 - After naming your speaker, the app will give you a chance to Trueplay your speaker to the room. This is a process that will adapt your speakers EQ depending on the room acoustics to make the speaker sound the best it can in your chosen room. You will need an Apple IOS device to carry this out, and you can skip this step and perform it at a later date. If you don't own an Apple IOS device, you can always borrow one to perform this procedure and then return it.
After first set up, you’ll be able to add streaming services to play music and voice assistant services like Amazon Alexa and Google Assistant to your speaker.
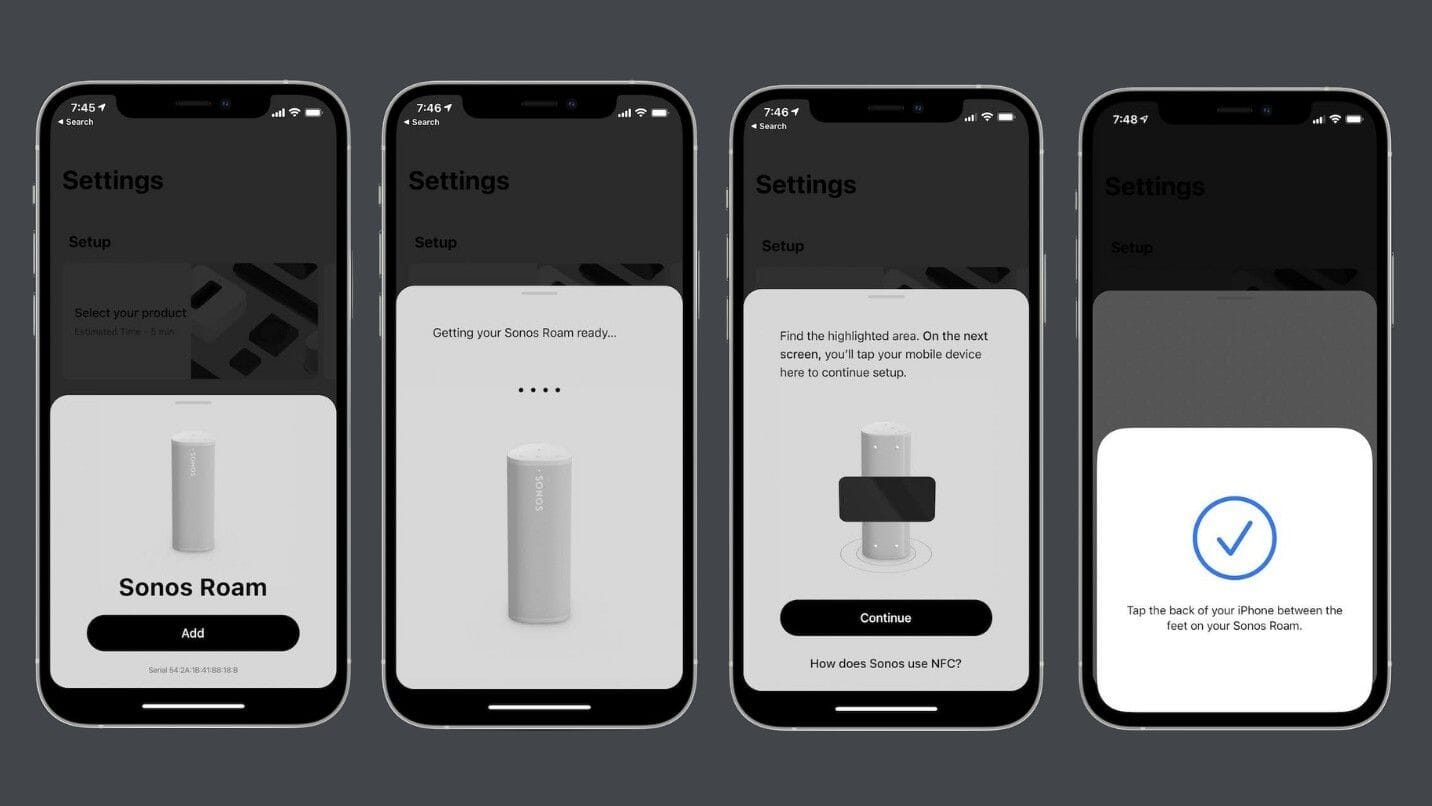
Setting up a Sonos Move, Sonos Roam or ROam SL
With Sonos’ portable range of speakers, initial set-up is a little different than with their core home speaker range.
Please note: You will need to first set up the Move, Roam or Roam SL on your Wifi network before being able to use Bluetooth mode.
Step 1 - Open the Sonos App on your iOS or Android device, then select set up a new system to create or sign in to your Sonos account
Step 2 - Hold the power button on the back of the speaker until the status light starts flashing green.
Step 3 - You’ll then need to tap ‘Add new speaker’ on the Sonos App, at which point the Sonos system should then locate the Roam, Move or Roam SL and you can follow the in-app steps.
To use the Roam, Move or Roam SL with Bluetooth, you’ll need to complete first set-up (above) and then press and hold the power button for 2 seconds to activate Bluetooth pairing mode. The status light will flash blue when ready to be set up, then show as solid blue when paired with a Bluetooth device.
That's it; you're all set up and ready to start listing to music!
Once you have completed the basic set-up above, you will then have the option to make use of all of the great Sonos in-app features.
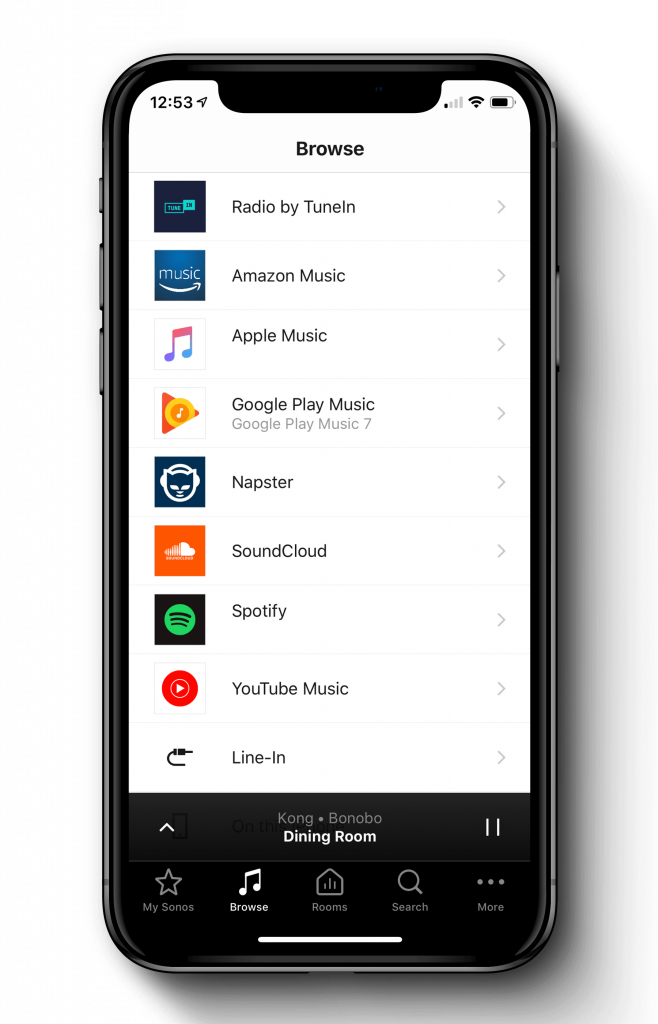
The first port of call for most Sonos users is to add their favourite music services to the app. This can be done quickly by going into 'More' in the bottom right of the Sonos mobile app. Then select 'Add Music Services' and search for the relevant provider.
Tune in radio comes pre-installed on the Sonos app so this will allow you to browse through digital radio stations from around the globe and incorporate them into your Sonos experience. Sonos makes it easy to enhance and personalize your listening habits. You can even save favourite songs or stations to 'My Sonos' allowing you to store music preferences in your profile.
Do I set up a Sonos TV speaker the same way?
Yes, the set-up is the same, but you will need to carry out the additional steps below.
Physically you will need to connect your Sonos soundbar to your TV before you start the above set-up. This will be by HDMI ARC for the Sonos Beam or optical for the PLAYBAR & PLAYBASE.
Finally, after you connected your Sonos TV speaker to your WiF, you will be asked to pair your TV's current remote control to enable the use of your TV remote to control the TV volume. We also recommend you select TV Autoplay in the set-up menu. This means your Sonos speaker automatically switches to the TV input once the TV is powered on.
If you'd like to pair your TV remote with your Sonos Soundbar with a Smart remote non-IR, please follow the simple steps in our blog: How to Pair your Smart TV Remote with Sonos Beam, Playbar or Playbase.
Common Sonos connection questions
Choosing Sonos wireless or wired connection
If you are worried that your WiFi network is poor or you have lots of wireless devices connected to your router wirelessly we'd recommend connecting a speaker directly to your router via an ethernet cable for a wired set-up.
The Sonos wired speaker set-up will create a dedicated wireless network specifically for your Sonos system. By doing this, your Sonos speakers will not compete with other wireless devices on your home network. Additionally, your Sonos products will be able to pass the wireless signal to other Sonos products, which means it's possible for Sonos to operate in a room that is beyond the reach of your WiFi.
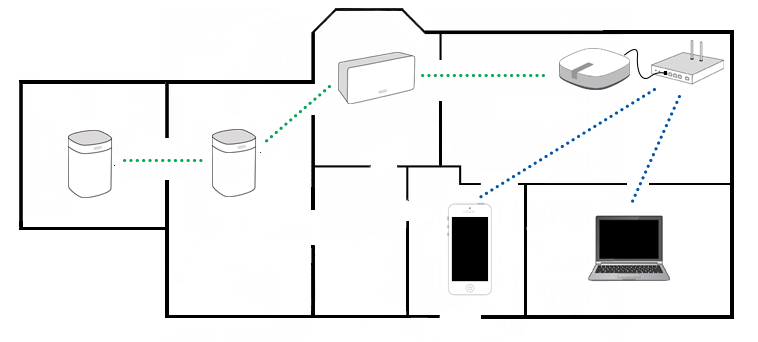
Sonos Wired Set-Up
If the router is far away from where your speaker is being positioned, you may hardwire a Sonos Boost to your router to achieve the same effect.
How to set up Sonos on a new WiFi Router
You have two options to connect your Sonos system to a different router. The preferred method is to reconnect your Sonos speakers without resulting in a factory reset. This will allow you to connect to a new wireless network, while still retaining your saved Sonos songs, playlists and stations.
To reconnect to a new network, please follow the steps in our dedicated blog How to Reconnect your Sonos system to a New Router or WiFi Network.
If these steps don't work for you or you want to connect to your new router without needing to use an ethernet cable, you will need to factory reset your Sonos speaker.
Please follow the steps in factory Resetting a Sonos Component to reset your speakers completely. Bear in mind; if you choose to factory reset your speakers, you will lose any music saved to 'My Sonos'.
Learn More?
The Complete Beginners Guide To Sonos
Top 10 Sonos App Tips and Tricks